
This is an example that presents how to create a user interface from a basic idea.
For a more practical approach, it is good to look at the UIHDemo provided on the UIHierarchy website.
This example will use among other things, a card panel (a panel using a card layout) that will switch upon an action on a button. This panel will contain different complex components.
We are going to build the following containment hierarchy:
// Basic configuration
We are in a frame, so set the title, etc.
// Components declarations
Declare the components for which we want a reference. In our case, at least the card panel, and the button.
// Start the containment hierarchy
* The content pane of a frame, using a grid bag layout.
- A label "A button" in the cell [0, 0].
- A text field in [1, 0], 10px spaces, expanding horizontaly.
+ A panel, using a card layout with a 20px margin, in [0, 1], spanning 3 cells, filling the rest of the content pane.
+ A split pane, in the first card of the card layout.
- A text area on the left part.
- A label "A label" on the right part.
+ A scroll pane in the second card.
* The viewport of the scroll pane.
+ A panel with a border layout.
- A long label, centered.
+ A tabbed pane, in the third card.
- A label "One" in a tab named "One".
- A label "Two" in a tab named "Two".
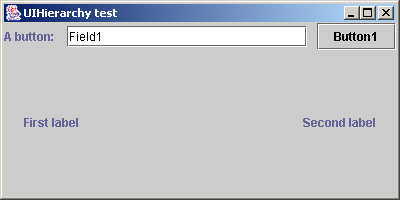
+ A panel using a grid bag layout, in the fourth card.
- A label "First label" (in [0, 0]) expanding horizontaly.
- A second panel (in [1, 0]).
// Listeners
Add a listener to the button to cycle through the cards defined by the card layout.
|
The result will give four panels, depending on the last action on the button.
The first screen the user sees. It is the first card of the card panel, which contains a split pane:
The second card, which contains a scroll pane:

The third card, featuring a tabbed pane:

The fourth card, demonstrating the use of yet another grid bag layout:
The implementation of the design is exactly the same. It defines each level of the hierarchy:
// Basic configuration
setSize(400, 200);
setTitle("Comparison - UIH");

// Components declaration
Container contentPane = getContentPane();
JTextField field1 = new JTextField("Field1");
JButton button1 = new JButton("Button1");
final JPanel cardPanel = new JPanel();
JTextArea textArea1 = new JTextArea(4, 10);

// Create hierarchy
UIH h = new UIH();
h.openNew(contentPane).layout(new GridBagLayout());
  h.add("A field: ").constrain("gridx=0, gridy=0");
  h.add(field1).constrain("gridx=1, gridy=0, insets=0:10:0:10, weightx=1.0, fill=HORIZONTAL");
  h.add(button1).constrain("gridx=2, gridy=0");
  h.open(cardPanel).layout(new CardLayout(20, 20)).constrain("gridx=0, gridy=1, gridwidth=3, weighty=1.0, fill=BOTH");
    h.open(new JSplitPane()).constrain("1");
      h.add(textArea1).constrain(JSplitPane.LEFT);
      h.add("A label").constrain(JSplitPane.RIGHT);
    h.close();
    h.open(new JScrollPane()).constrain("2");
      h.openNew(((JScrollPane)h.getContainer()).getViewport());
        h.open().layout(new BorderLayout());
          h.add("A really long label compared to others").constrain("center");
        h.close();
      h.close();
    h.close();
    h.open(new JTabbedPane()).constrain("3");
      h.add("One").constrain("One");
      h.add("Two").constrain("Two");
    h.close();
    h.open().layout(new GridBagLayout()).constrain("4");
      h.add("First label").constrain("weightx=1.0, fill=HORIZONTAL");
      h.add("Second label");
    h.close();
  h.close();
h.close();

// Print the hierarchy (for debugging, see below)
h.print();

// Listeners
button1.addActionListener(new ActionListener() {
  public void actionPerformed(ActionEvent e) {
    ((CardLayout)cardPanel.getLayout()).next(cardPanel);
  }
});
|
Using XML to load the hierarchy, the rest of the code is the same.
The only addition is the resolution of components in the XML from a name. We could use a custom ComponentResolver, but let us use an array:
// Basic configuration
setTitle("UIHierarchy test");
setSize(400, 200);
setDefaultCloseOperation(JFrame.EXIT_ON_CLOSE);

// Component declaration
JTextField field1 = new JTextField("Field1");
JButton button1 = new JButton("Button1");
final JPanel cardPanel = new JPanel();
JTextArea textArea1 = new JTextArea(4, 10);

// First XML possibility: names of the components are declared explicitely.
JScrollPane scrollPane = new JScrollPane();
try {
  XmlUIH xmlUIH = new XmlUIH();
  xmlUIH.build(getClass().getResourceAsStream("HierarchyTestFrame.xml"), new Object[] {
    "contentPane", getContentPane(),
    "field1", field1,
    "button1", button1,
    "cardPanel", cardPanel,
    "splitPane", new JSplitPane(),
    "textArea1", textArea1,
    "scrollPane", scrollPane,
    "viewPort", scrollPane.getViewport(),
    "tabbedPane", new JTabbedPane(),
  });

// Print the hierarchy (for debugging, see below)
  xmlUIH.getUIH().print();
} catch (Exception e) {
  e.printStackTrace();
}

// Listeners
button1.addActionListener(new ActionListener() {
  public void actionPerformed(ActionEvent e) {
    ((CardLayout)cardPanel.getLayout()).next(cardPanel);
  }
});
|
In the file called "HierarchyTestFrame.xml", located in the same package in our case, the content would be:
<?xml version="1.0"?>
<!DOCTYPE uih
    PUBLIC "-//UI Hierachy DTD 1.0//EN"
    "http://www.nextencia.net/projects/uihierarchy/uih.dtd">

<uih>
  <hierarchy>
    <rootNode name="contentPane" layout="GridBagLayout">
      <leaf value="A field: " constrain="gridx=0, gridy=0"/>
      <leaf name="field1" constrain="gridx=1, gridy=0, insets=0:10:0:10, weightx=1.0, fill=HORIZONTAL"/>
      <leaf name="button1" constrain="gridx=2, gridy=0"/>
      <node name="cardPanel" layout="CardLayout" constrain="gridx=0, gridy=1, gridwidth=3, weighty=1.0, fill=BOTH">
        <layoutParam>
          <param class="int" value="20"/>
          <param class="int" value="20"/>
        </layoutParam>
        <node name="splitPane" constrain="1">
          <leaf name="textArea1" constrain="left"/>
          <leaf value="A label" constrain="right"/>
        </node>
        <node name="scrollPane" constrain="2">
          <rootNode name="viewPort">
            <node layout="BorderLayout">
              <leaf value="A really long label compared to others" constrain="center"/>
            </node>
          </rootNode>
        </node>
        <node name="tabbedPane" constrain="3">
          <leaf value="One" constrain="One"/>
          <leaf value="Two" constrain="Two"/>
        </node>
        <node layout="GridBagLayout" constrain="4">
          <leaf value="First label" constrain="weightx=1.0, fill=HORIZONTAL"/>
          <leaf value="Second label"/>
        </node>
      </node>
    </rootNode>
  </hierarchy>
</uih>
|
UIHierarchy allows to print the content of a hierarchy declaration.
It is really convenient to understand an existing UIHierarchy or to check that everything is correct.
The result in this case is:
> UIH [Closed: true] [Realized: true]

  * JPanel [Layout: GridBagLayout]
    - JLabel [Cons: gridx=0, gridy=0]
    - JTextField [Cons: gridx=1, gridy=0, insets=0:70:0:10, weightx=1.0, fill=HORIZONTAL]
    - JButton [Cons: gridx=2, gridy=0]
    + JPanel [Layout: CardLayout] [Cons: gridx=0, gridy=1, gridwidth=3, weighty=1.0, fill=BOTH]
      + JSplitPane [Cons: 1]
        - JTextArea [Cons: left]
        - JLabel [Cons: right]
      + JScrollPane [Cons: 2]
        * JViewport
          + JPanel [Layout: BorderLayout]
            - JLabel [Cons: center]
      + JTabbedPane [Cons: 3]
        - JLabel [Cons: One]
        - JLabel [Cons: Two]
      + JPanel [Layout: GridBagLayout] [Cons: 4]
        - JLabel [Cons: weightx=1.0, fill=HORIZONTAL]
        - JLabel
|